Find it fast!

Monday, September 25, 2017

5 ingredient Garlic and Cilantro Green Beans with EVOO: "Lubyeh bil Zait"


Summer is most definitely over, and we are back in the insanely busy groove of things! My weekday routine is a big mesh of 3 different school pick-ups and drop offs, plus the typical myriad of after school activities. Dinner needs to be ready when the kids are, and not the other way around ;)

This has caused me to turn back to the basics, and for the first time since I've started cooking in 15 years, I made this easy easy easy green bean saute. All because I found beautiful bright and deeply green colored fresh green beans one day this past summer at my local market. I scooped them up and went home to make this, and now we eat it a few times a month. Everyone except the pickiest member of the family has surprised themselves by loving it, and I love how simple and nourishing it is. Since fresh green beans are not as easy to find these days, I keep my freezer stocked with the french green beans from Trader Joe's. They're actually even easier to cook because they're pre-washed and the ends are already snipped.


I have no idea why I've never made this before. Its a handful of ingredients and it goes so well as a side to grilled chicken or meat, or all on its own for a vegetarian dinner. I love it straight from the pot or straight from the fridge. I've never tried eating it from an actual plate...it's either piping hot off the stove or cold in a tupperware. Lol, just kidding. Or am I? You'll probably find yourself doing the same when you make it.

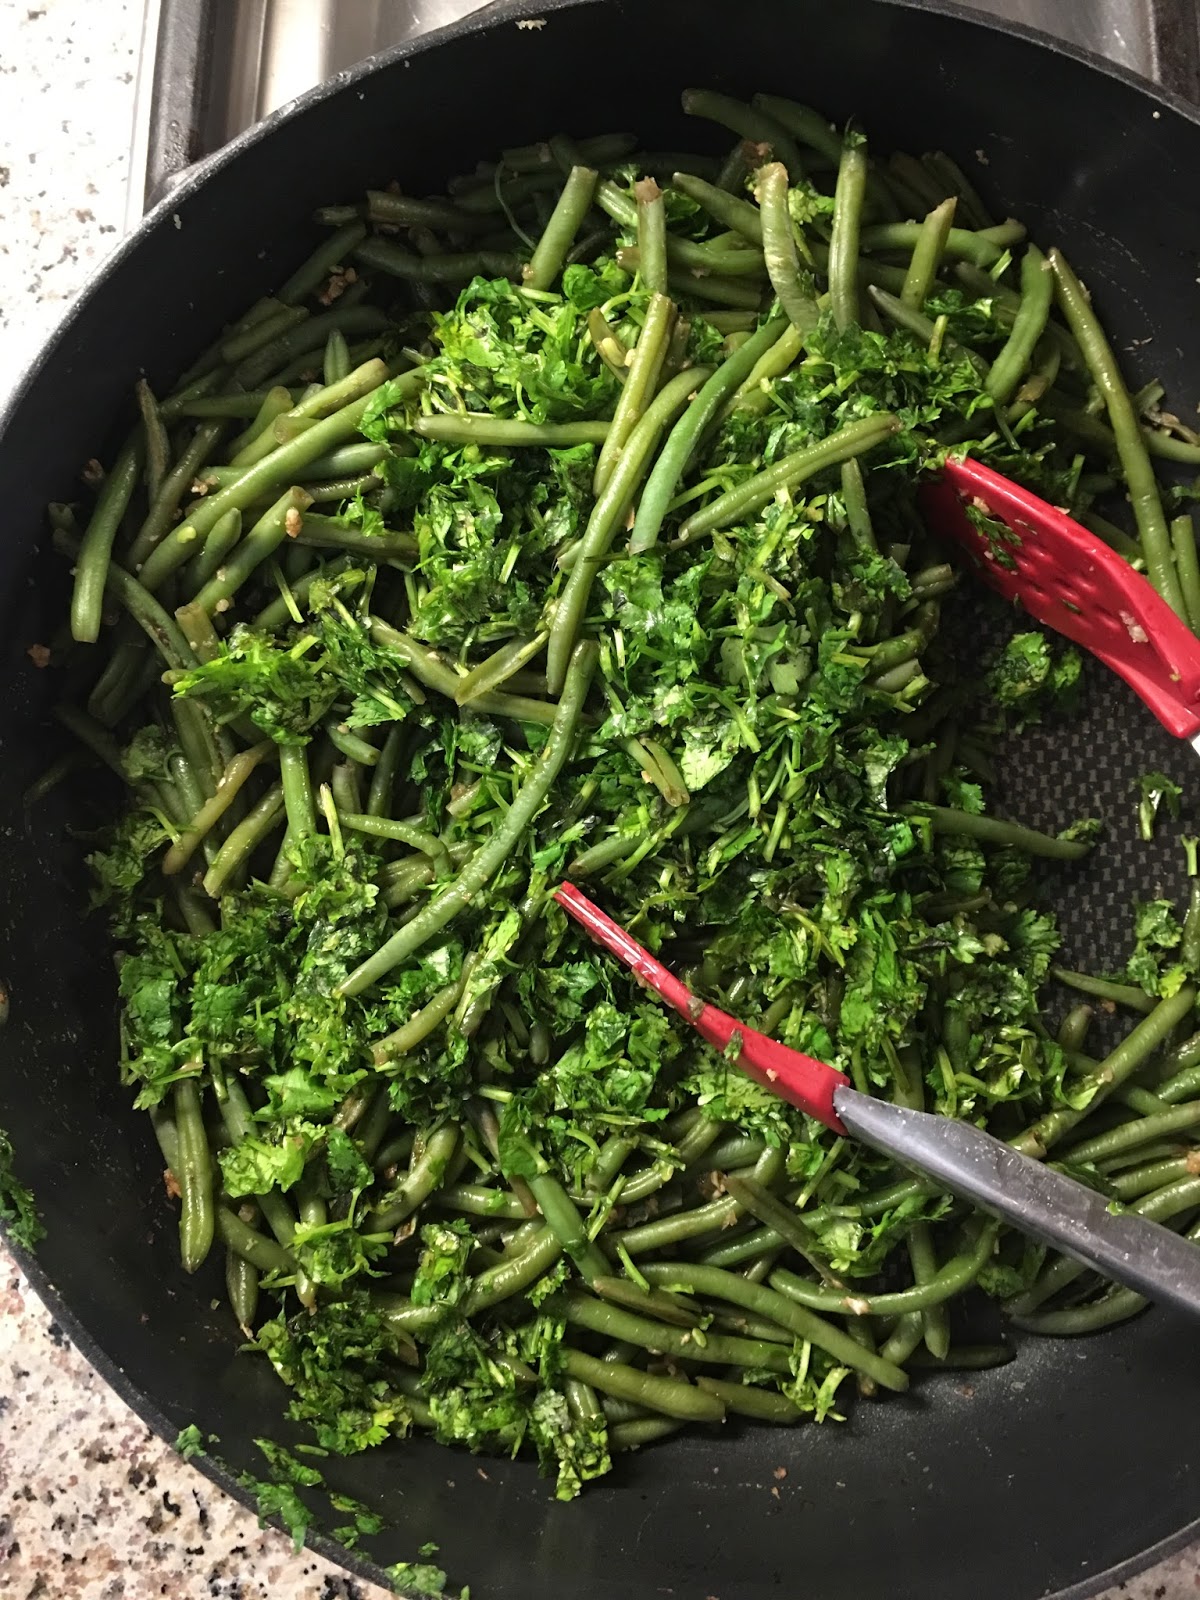
In Syria, this is called "lubyeh bil zait" meaning "green beans in oil". This dish relies on the THIN green beans, and there is a similar version that swaps the garlic and cilantro for onions and tomatoes, using larger green beans, but I've never been a fan of that one and just sort of forgot about this version. So glad I remembered it, and so happy to share it with you!!!


Serves 2 as a main dish and 4 as a side dish.

Ingredients
--------------
-24 ounces french green beans (frozen or fresh, look for the thinnest stalks)
-1/4 cup water, optional
-10 cloves garlic, mashed
-1/2 tablespoon salt
- 1 1/2 cups packed cilantro, chopped (1 large bunch cilantro)
-2-4 tablespoons extra virgin olive oil

Serving suggestions
-------------------------
-yogurt
-lemon
-pita bread

Directions
--------------
-Heat a medium sized pot or deep saute pan on high heat. Add the green beans (if using fresh, make sure you wash them, snip the tips on both sides, and cut them into 3 inch long pieces). Lately I have been using frozen ones because this makes the perfect short notice meal when I'm low on fresh produce. Also the beans don't need much water when they're frozen.
-Cook the beans in the covered pot for about 5 minutes. You want them to soften, but still have a slight bite to them. Mushy beans are not yummy!
-Reduce the heat to low to slowdown the cooking of the beans and add the minced garlic and salt to the green beans and give it a stir. If your beans are starting to stick to the bottom of the pot and are still too firm, add UP TO 1/4 cup water. Let the garlic become fragrant (which means it is slightly cooked).
-Add the cilantro and give the beans a mix. Cook for a minute or so longer to slightly wilt the cilantro, and turn off the heat.
-Add the olive oil and mix. I start with 2 tablespoons (to keep it lower in fat) and will add more if I'm making this dish for company.
-Serve hot, warm, or room temperature with optional yogurt, a squeeze of lemon, and pita bread.
-Enjoy!!!

I'd love to connect with you! Stay updated on the latest posts through Facebook or follow savvy_chef on Instagram. Tag #savvychef with your re-creations!

Friday, April 1, 2016

Creamy Baked Eggs

Ready to bake!

The first time I tried these eggs at my friend Amani's  home I was BLOWN away. The cream was so decadent and speckled with flavor from the herbs and garlic. The eggs were baked perfectly, and the buttery crunch from the flaky croissant I used to scoop all the sauce was pure perfection. It was an amazing meal.


 A short while later, across the country, I visited this same friend again (she's the most gracious hostess ever) and there was this dish, displayed in all its glory. Still amazing. I got the verbal rundown of ingredients, flew back to California, and instantly recreated it. I've adapted the herbs to what I usually have on hand, and the measurements have all been trial and error on my part, but I will be eternally grateful (as are all the guests who've brunched at my home and had this, as it is now a staple at my parties too) to my friend for passing this on!


I especially love the addition of lemon zest, as it really brightens the flavors of what can be a heavy meal. The garlic and herbs meld so beautifully with the cream, and while using fresh is always better, dried herbs serve their purpose just fine if need be. I can't wait for you guys to fall in love with this as I have...let me know what you think!


Serves 4 adults

Ingredients
--------------
-1 cup heavy whipping cream
-1 teaspoon lemon zest
-1 clove garlic, minced (can substitute dried)
-1 1/2 teaspoons salt
-1/2 teaspoon ground black pepper
-1 tablespoon dried parsley (fresh is even better!)
-1 tablespoon dried chives (or use fresh green tips of green onions)
-8 large eggs
-sprinkle of salt
-1/3 cup shredded Parmesan cheese

*croissants or fresh bread for serving

Instructions
----------------
-Preheat oven to 400 degrees farenheit
-In a 9 inch baking dish, mix together the cream, lemon zest, garlic, salt, black pepper, parsley and chives. ---Carefully crack the eggs into the baking dish, one at a time, leaving a gap of cream between them. ---Sprinkle the tops of the eggs with a little extra salt and Parmesan cheese.
-Bake on middle rack for 15-25 minutes, depending on how set you want the eggs. A quick tip to help cook the eggs is to set the oven to broil after 15 minutes. Watch it carefully so the egg yolks don't harden too much and the cheese doesn't burn.
-Serve with croissants or fresh bread.
-Enjoy!


I'd love to connect with you! Stay updated on the latest posts through Facebook or follow savvy_chef on Instagram. Tag #savvychef with your re-creations!


Try these other breakfast favorites!


Egg and Cheese Quesadillas

Eggs in a Blanket

Tisi'yeh: Garbanzo Beans and Pita Bread  in a Tahini Yogurt Sauce

Friday, March 25, 2016

Walnut Date Cake


This cake has so much going for it...the natural sweetness from the dates contributes nutrients, flavor, and an undeniable SOFT texture. It's so fragrant and the color is a deeply rich brown that promises intense satisfaction from your first glance. The nutty crunch of the walnuts pairs perfectly with the stickiness of the dates. The coffee may come as a surprise to you in the list of ingredients, but you won't taste it...what you will taste is strong flavors from the other ingredients, and  you can thank the coffee for that! The brown sugar adds a hint of molasses and density, and the white sugar contributes to the cake-y texture.


In short, this cake is perfection. Should I keep going or are you ready to just make it?


Serves 16

Ingredients
---------------
-17 ounces pitted pureed dates  (about 2 cups packed pitted whole dates, see ** at the below instructions to read how to make this cake with whole dates instead of pureed dates)
-1 1/2 cups hot coffee (either brew fresh coffee or mix instant coffee with hot water)
-1 tablespoon vanilla flavor
-1 teaspoon baking soda

-3 eggs
-1/2 cup white granulated sugar
-1/2 cup packed brown sugar
-1 tablespoon vanilla flavor
-1/3 cup melted coconut oil

-2 cups flour
-1 1/2 teaspoons baking powder
-1/4 teaspoon salt
-1 teaspoon ground cardamom (use half this amount or omit completely if not a fan of cardamom)
-1/4 teaspoon ground nutmeg
-1 1/2 cups chopped walnuts
-1 cup mini chocolate chips (optional)

Optional garnish: powdered sugar, whole walnuts

To make
----------
-Preheat oven to 350 degrees and grease a bundt pan or 13x9 inch pan.
-In a medium bowl, place the date paste and pour the hot coffee, vanilla and baking soda over the paste. Break up the date paste into chunks and come back and stir the mixture every minute or so. As the date paste sits in the hot coffee it will soften and eventually you will be able to stir the mixture until the date paste is smooth and the coffee has completely mixed into the dates.
-In a stand mixer or a large bowl, combine 3 eggs, white and brown sugars, and vanilla flavor then cream using an electric beater. I leave my mixer running while the date paste softens.
-In another medium bowl, mix together the dry ingredients (flour, baking powder, salt, ground cardamom and ground nutmeg).
-Once the date paste has softened completely, add the MELTED coconut oil and the dissolved date mixture. Keep mixing until the batter is well combined. You will notice a color difference when it is well mixed because the egg/sugar batter is pale and the date/coffee mixture is very dark.
-Turn your mixer setting to the lowest speed and slowly add the dry ingredients. When it is almost completely blended (you can still see lumps of flour) add the chopped walnuts (plus optional chocolate chips) and continue mixing. Try NOT to over mix your batter so the cake doesn't dry out.
-Pour the batter into the greased bundt pan and bake for 45-55 minutes (mine takes exactly 50 minutes). I bake my cake on the 2nd lowest rack in the oven, between the lowest rack and the middle portion. Your cake is finished when  a toothpick inserted in the middle comes out with a few crumbs attached.
-Cool your cake then flip on a serving platter and garnish with optional powdered sugar and whole walnuts. Store leftovers covered tightly at room temperature.
-Enjoy!

**If you are using whole dates instead of date paste simply pit the seeds of the dates and place in a food processor with the hot coffee, vanilla flavor and baking soda. Let the mixture sit for about 10 minutes to soften the dates then puree them to a fine paste consistency. Proceed with the recipe.


I'd love to connect with you! Stay updated on the latest posts through Facebook or follow savvy_chef on Instagram. Tag #savvychef with your re-creations!

Try these other great treats!
Classic Banana Bread (most viewed banana bread recipe!)


Chocolate Fig Truffles

Wednesday, March 16, 2016

Maple Glazed Apple Cider Muffins (Vegan)


Sometimes the best recipes come from random things sitting in the fridge or pantry. Day after day I was opening my fridge and staring straight at an opened bottle of apple cider. The unfiltered kind from the bottled juice section at Trader Joe's, not the the sparkling variety. I don't like to give my family too much juice and had only bought this for a recent brunch. Finally I pulled it out determined to make something delicious out of it, and these muffins are the result. Just the right sweetness, so much warmth from the cinnamon, and a happy burst of maple glaze right on top!


These muffins are ridiculously easy and just SO. MOIST. They literally melt on your tongue. I credit that to the amount of juice used in the recipe. When you pour your batter into the cupcake cups you'll feel like its almost soup-y. Have no fear, that translates into softness! The brown sugar gives a lovely hint of molasses and of course contributes to the perfect texture in these gems. You'll notice there are no eggs..you don't need them! This recipe is developed for maximum fluffy texture, and eggs are more useful when you're aiming for a dense treat. We make up for the loss of moisture with more liquid :) The vinegar helps the muffins rise but I promise you can't taste it, don't leave it out!


Yields 15 muffins

Ingredients
---------------
-2 1/4 cups flour
-3/4 cup granulated sugar
-3/4 cup brown sugar
-1 1/2 teaspoons baking soda
-3/4 teaspoon salt
-1 tablespoon ground cinnamon
-1/4 teaspoon nutmeg
-1/4 teaspoon cloves
-1 1/2 cups apple cider at room temperature (can also use apple juice) *If not room temperature, microwave for 30 seconds or so. Do not let the liquid get hot*
-1/2 cup vegetable oil
-1 1/2 tablespoons apple cider vinegar
-1 1/2 teaspoons vanilla extract

*Optional: 1/2 cup dried raisins or chopped walnuts/pecans

Glaze
--------
-1 tablespoon maple syrup (sub apple cider/juice if you do not have maple syrup)
-1/4 cup powdered sugar (you may need an extra tablespoon)

Instructions
----------------
-Preheat oven to 350 degrees
-Line a cupcake pan with liners or spray cavities with a non-stick cooking spray. 
-In a large bowl combine the flour, granulated sugar, brown sugar, baking soda, salt, cinnamon, nutmeg and cloves. Mix together and set aside.
-In a medium bowl combine the apple cider juice , vegetable oil, vinegar and vanilla.
-Add the wet (apple juice mixture) ingredients to the dry (flour mixture) ingredients and stir until well blended. Add optional raisins or chopped nuts.
-Fill the lined cupcake cavities 3/4 full and bake on a lower middle rack in oven for 18-22 minutes (mine were perfect at 20) or until a few moist crumbs stick to a toothpick inserted in the middle of a muffin.
-Remove the muffins from oven and allow to cool.
-While the muffins are baking, in a small bowl blend together the apple cider and powdered sugar mixture. I use a mini whisk to get a smooth texture. If the glaze is too runny, add a little bit more powdered sugar.
-When the muffins have cooled, dip the top of each muffin into the glaze and hold upside down while the extra glaze drips off back into the bowl. After I dip all the muffins, I like to re-dip each muffin again after the glaze has set a bit for a nice thick coating.  Allow glaze to harden and serve. Store extra muffins tightly covered at room temperature for 3-5 days.
-Enjoy!


I'd love to connect with you! Stay updated on the latest posts through Facebook or follow savvy_chef on Instagram. Tag #savvychef with your re-creations!

 Walnut Baklava


Thursday, March 10, 2016

Nutella Peanut Butter Stuffed French Toast Bake


Lately I've played with various versions of baked french toast. The BEST french toast (I have to say right from the start that I'm not usually a fan) I've ever had is from The Griddle Cafe in Los Angeles. If you can make it there to get their 'peanut bubba' french toast, you should! This is my ode to that amazing "dessert-disguised-as-breakfast" dish. 

I've hosted a ton of brunches, and without a doubt my tip to success is advance preparation. You don't have the whole day to get a meal ready for breakfast...unless you start the day before. I try to make at least 2 entrees that are 90% ready to go the evening leading up to my gathering, and no matter how hectic things get in the early morning as I'm trying to finish on time, it helps to know I've got a couple things crossed off the list.  This french toast is also perfect for family mornings when you want to wake up, be lazy and still have a delicious homemade breakfast to eat. Let's be honest, this is more dessert than breakfast, but hey, who's complaining?


It took a couple tries to get the exact ratio of eggs/cream/milk for the batter, and now these measurements will give you soft, fluffy french toast with a crispy top. The graham crackers are a fun addition for flavor and texture. The first time I made this french toast it was a strictly peanut butter version (refer back to the first paragraph) and that's when I took the photos. It was amazing as is, but to please the weirdos in my family who don't approve of pb, I threw in the Nutella the next few times around and it was WOW. Complete pb and Nutella bliss. The cookie crumbles on top, freshly whipped cream, warm maple syrup...this is the breakfast that dreams are made of. 

Not a fan of peanut butter? This would taste sooo good if you swap out the pb for cookie butter! Leave it out and use only the Nutella (or vice versa) for other variations. Sliced bananas stuffed in with the filling would also be a nice touch. The possibilities are endless!

All prepped and ready to bake!

Makes 16 slices
Ingredients
-------------------
-3 eggs
-1/4 teaspoon salt
-1 tablespoon vanilla
-2/3 cup cane sugar
-1 cup milk
-1 cup heavy cream
-1 teaspoon cinnamon
-3 full sheets graham crackers, finely crushed
-1 loaf french bread, day old preferred
-1/2 cup peanut butter
-1/2 cup powdered sugar
-1/3 cup heavy cream
-1 teaspoon vanilla
-2 cups Nutella

Optional toppings
------------------------------
-maple syrup
-fresh whipped cream
-sliced bananas

To make
---------------
-In a 13x9 baking dish,  crack your eggs and beat them with a fork or whisk. Add salt, vanilla, sugar, milk, cream and cinnamon and whisk the entire mixture. Set aside.
-Starting with a clean surface or cutting board, slice a loaf of thick french bread (or brioche) horizontally leaving the edge attached and lay open. Now your loaf will be split open like you are about to layer a sandwich.
-In a medium bowl whisk together peanut butter, powdered sugar, heavy cream and vanilla until smooth. Spread the mixture on 1 side of the split loaf of bread.
-On the other length of the split loaf spread the Nutella mixture in a nice thick layer. Make sure your peanut butter mixture and your Nutella extends all the way to the edges of the bread. Gently close the loaf of bread. Now you have a layer of peanut butter and a layer of nutella over it between 2 layers of bread.
- Using a serrated bread knife, carefully cut 16 slices out of the peanut butter Nutella loaf.
-One slice at a time, dip each piece of french toast into the egg mixture. Make sure you dip them on both sides so the bread can soak properly. After you dip the slices layer them in two rows across the baking dish.
-Coarsely crush the graham crackers over the top of the french toast. Cover and refrigerate 6 - 12 hours (overnight).
-When you are ready to bake the french toast, uncover and place it in a preheated oven  at 425 degrees for 25-30 minutes on the lower rack of your oven.
-Remove your french toast from the oven and give it a generous drizzle of maple syrup.
-Serve with fresh whipped cream, sliced bananas, and extra maple syrup on the side.
- Enjoy!

I'd love to connect with you! Stay updated on the latest posts through Facebook or follow savvy_chef on Instagram. Tag #savvychef with your re-creations!

Try these other brunch favorites!

Tisi'yeh/Fattet Hummus
Classic Banana Bread
Raspberry Oat Bars
Cheese and Parsley Pasta: Middle Eastern Mac n' Cheese


Thursday, February 25, 2016

Homemade Ranch Dip (aka BEST RANCH EVER)


I've been experimenting with the perfect ranch dressing for a couple months. I can't swallow a even the tiniest bite of the bottled junk and the I pick and choose my favorite restaurants based on who has the better ranch. I love saucy things and this condiment tops my list.


I had strict requirements for how my ranch needed to be:
1) I needed to health-ify it so I would feel comfortable feeding it to myself and children in copious amounts.
2) It couldn't be mayo based or have raw eggs. That's just ew.
3) Like most other things I make, easy to throw together and must be made with simple ingredients.
4) It needed to taste as close to Red Robin restaurant ranch as possible.

Finally, I've come up with a combination that meets all those requirements, plus more that popped up along the way! This blend of measurements produces the BEST RANCH EVER. Thick, smooth, tangy, herby and down right delicious. Nothing watery and runny about this dip, I promise you.


Make sure to prepare this the day before you need to eat it...you will taste a flavor difference! Allowing the ranch to set overnight in the fridge lets the dried herbs bloom and the flavors shine through. Most people who tried this are surprised when they find out all the herbs are dried because the flavors are vibrant and fresh.


This ranch is so good its starting to replace salad on the dinner table every night. For starters, its way easier to throw a bunch of veggies on a tray and place the dip in the middle, but the best part is that I've noticed my kids consume way more veggies when they can pick and choose the ones they like then dunk them to their heart's content in this delicious dip. Win win.

Happy dipping!

Yields 1 2/3 cups of dressing

Ingredients
---------------
-1/4 cup milk (1%, 2% or full fat)
-1 1/2 tablespoons lemon juice
-1 cup non-fat Greek yogurt (can sub sour cream)
-1/4 cup mayonnaise
-1 teaspoon salt
-1/2 teaspoon freshly ground black pepper
-1 teaspoon garlic powder
-1 1/2 teaspoons onion powder
-1 1/2 teaspoons dried dill
-1 1/2 teaspoons dried parsley
-1 1/2 teaspoons dried chives
-1 teaspoon dried marjoram (optional)

To make
------------
-I like to use a large measuring cup to mix this together. Mix together the milk and lemon juice and leave for 5 minutes. You are making your own buttermilk.
-After 5 minutes the milk will have slightly curdled and thickened and is now buttermilk. Using a small whisk (or spatula/fork), stir it together and add the rest of the ingredients (Greek yogurt, mayo, salt, pepper, garlic, onion, dill, parsley, chives and marjoram). Whisk the mixture together until well blended.
-Cover and refrigerate at least 4 hours, but I have found that the flavors are the most combined by the next day.
-Serve as a salad dressing or dip for veggies!
-Store in a tightly sealed container in the refrigerator. Stays fresh for 7-10 days.
-Enjoy!


I'd love to connect with you! Stay updated on the latest posts through Facebook or follow savvy_chef on Instagram. Tag #savvychef with your re-creations!


Try these other favorite dips! 

Babbaganoush: Roasted Eggplant Dip


Beet Hummus

Olive and Garlic Walnut Dip


Tuesday, February 23, 2016

Classic Banana Bread


Without a doubt, banana bread is the single most frequently baked treat in my home. I look for ripe bananas at the market so we don't have to wait too long for them to be ready at home...I make a loaf weekly and it doesn't EVER see its 3rd day. At this point baking banana bread has an emotional significance to me because its become one of those unintentional traditions...my kids come home on Monday to the fragrant smells of banana and vanilla and have a slice after school. After dinner, they grab another slice. The next morning on their way out to school, they grab yet another piece...by the time they get home they're lucky if there's any left...and they wait for the following Monday to get their "bb" fix again. Banana bread makes Mondays a little less bleak, and who doesn't love that?!


If you go through my blog, you'll find several versions of this yummy cake. Here's how this new and improved version is different:


1) I've gone back to the basics and removed any extra ingredients or flavors (Greek yogurt, pumpkin, pumpkin butter, oats, etc.) to celebrate banana bread in all its glory, as a simple and utterly amazing bread. This translates into quicker prep time and fewer ingredients for you.


2) The texture of  banana "bread" instead of banana "cake" has been achieved with the tweaking of measurements. I'll let you in on my hugest revelation...an extra EGG was what it took to get a perfectly dense crumb on this treat (and not Greek yogurt or honey or any of the other stuff I've played with over the years).


3) Flax seeds are amazing. Adding them instead of walnuts takes care of potential nut allergies, gives a huge boost of nutrition and provides the nutty flavor that so many of us love with banana bread. If you don't like them, not a problem, just leave them out!


4) MOST IMPORTANT: Your bananas must be RIPE RIPE RIPE RIPE RIPE. And by ripe I mean too brown to enjoy on their own, but not nasty enough that you need to toss them out. When bananas get very ripe, their flavor deepens and they become sweeter, then when they're baked you will get that intense banana flavor that resembles a professional baked treat. Whatever you do, resist the urge to prepare this banana bread without ripe bananas, it will be the difference between an average bread and an AMAZING one (and you are completely capable of amazing, regardless of your experience!).


Makes 16 slices when baked in a bundt pan

Ingredients
---------------
-3 eggs
-1/2 cup granulated sugar
-1/2 cup brown sugar
-1 teaspoon vanilla
-1/3 cup melted coconut oil (or vegetable oil)
-4 OVER RIPE mashed bananas (2 cups)

-2 cups flour
-1 1/2 teaspoons baking soda
-1/2 teaspoon salt
-1 teaspoon ground cinnamon

Optional add-ins (up to 1 cup total)
-------------------------------------
-1 tablespoon flax seeds
-chopped nuts
-chocolate chips
-chopped dried fruit or dates

To make
------------
-Preheat oven to 350 degrees and grease a bundt pan.
-Using an electric mixer or by hand, mix eggs, granulated sugar, brown sugar and vanilla together. Stir in melted coconut oil and mashed bananas.
-In another bowl, stir the dry ingredients (flour, baking soda, salt, ground cinnamon) together and slowly add to the banana mixture. Stir until everything is moistened but DO NOT overmix so your banana bread stays moist. Gently add optional flax seeds or other add-ins.
-Pour mixture in greased pan and bake on the lower rack of a preheated oven for 40-50 minutes (I take mine out at 45 minutes). If you are baking in a loaf pan your bake time will be closer to 60 minutes. Your banana bread is finished when an inserted toothpick comes out with a few crumbs attached.
-Remove from the oven and cool completely. Flip onto a platter and garnish with optional powdered sugar. Serve.
-Enjoy!

I'd love to connect with you! Stay updated on the latest posts through Facebook or follow savvy_chef on Instagram. Tag #savvychef with your re-creations!

Try these other treats!

Skinny Banana Oat Muffins
Vegan Orange Muffins

Double Chocolate Zucchini Cake

Chocolate Pumpkin Cupcakes with Cream Cheese Frosting