Find it fast!

Wednesday, March 25, 2015

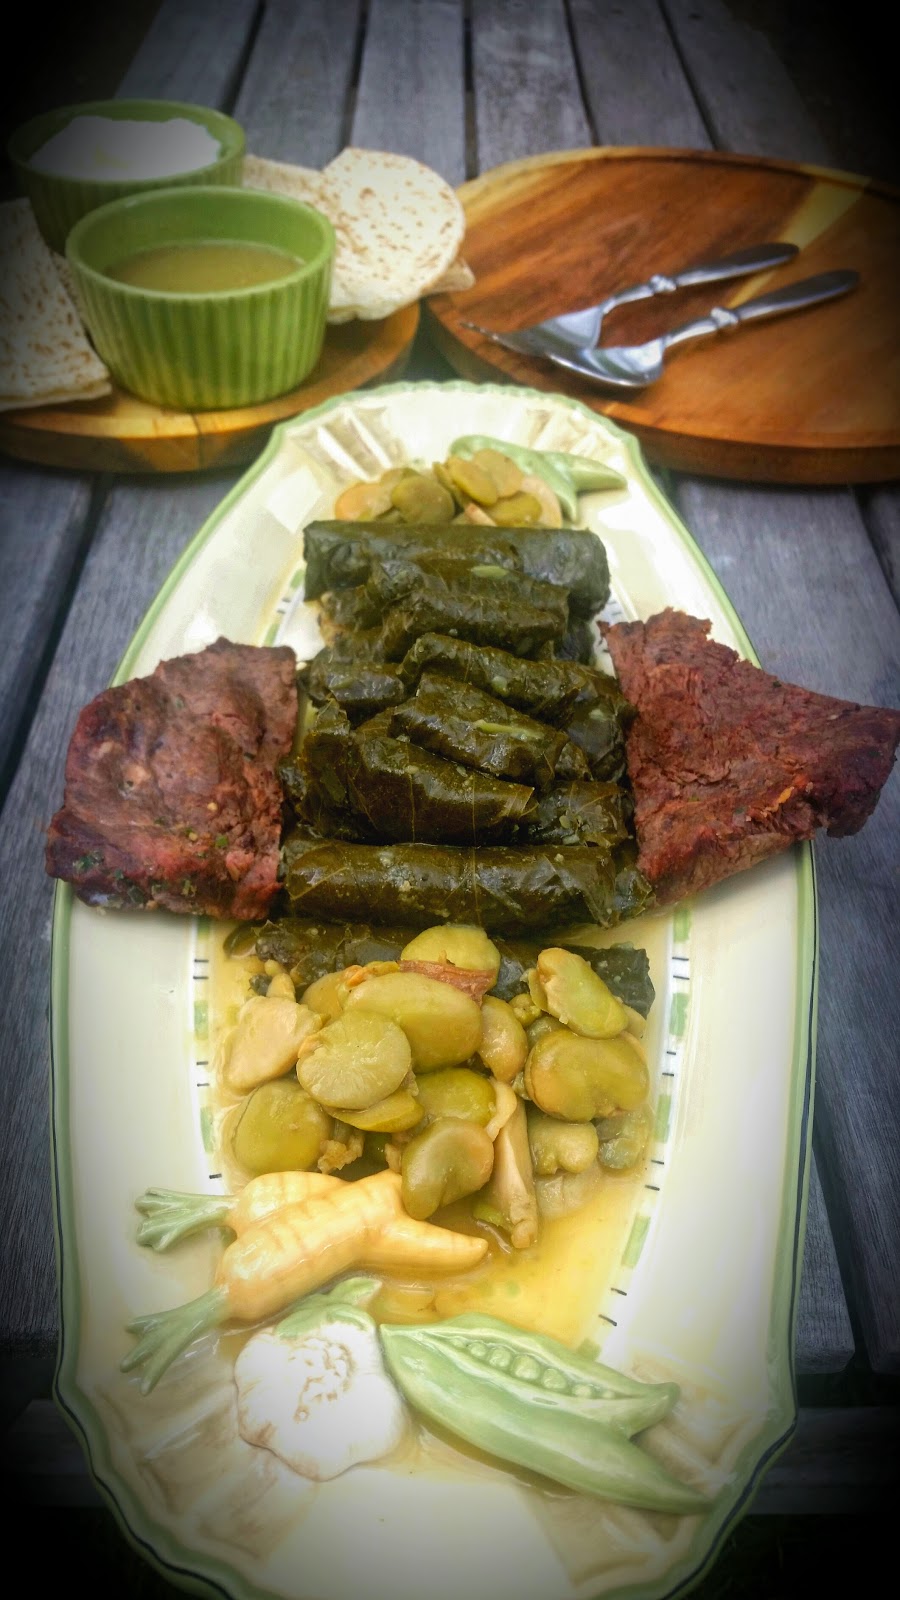
Grape Leaves stuffed with Meat and Rice


Grape leaves are one of the most delicious, traditional and complicated Middle Eastern dishes out there. This dish is lovingly referred to as yabraa, yabraq, waraq einab, dawali, dolmadas...each country calls it something different but everyone agrees that it is AMAZING. In this post I have tried to simplify the process as much as possible, and although this meal does not conform to the SavvyChef mantra of simple meal prep, its just too yummy not to share :) Luckily the ingredients are fairly simple, and the actual effort comes in the preparation.


This post has been almost a year in the making because I needed to cook it AMPLE times to ensure my ratios are absolute perfection before I encourage you to spend hours on preparation. There are almost no proper measurements available for exactly how much rice/meat/grape leaf ratio to prepare so you are not left with extra filling, and in this recipe I have finally accomplished that. My family thanks all the readers who have been urging me to complete a post on this recipe because of all the times they've eaten the tester meals ;)


There are many varieties for grape leaves, and each country in the Middle East (as well as Turkey, Greece...) prepares them differently. I am biased to the Syrian way, specifically the Damascene method. These grape leaves are succulent and juicy, stuffed with a seasoned rice and meat filling and then cooked until the leaf is fork tender in a tangy lemon and garlic sauce. This is my all time favorite meal, and I would eat it everyday if I could.


I highly recommend you read through the whole post before you begin to let you know what to expect as you go along.


Tips to ensure a smoother experience:
1. Have all of your spices and ingredients out and ready before you begin. Once you start mixing the filling with your hands it will be difficult to open cabinets and reach for things.
2. Block off a span of 2-3 hours (hopefully it won't take 3 hours) to complete this project, especially if it is your first time. I realize this is a large amount of time and it is difficult to do this with work/little children/other commitments, but if possible it makes a difference.
3. If it is your first time attempting grape leaves, either start in the morning or have a back up for that night's dinner. Plan on wrapping the grape leaves on one day and cooking the next (especially if you are going to slow cook them). This is what I do and it reduces the stress involved with needing to finish quickly.
4. Do not be discouraged if yours are not all the same size or if they look messy. The important thing is to keep the meat and rice mixture inside the grape leaf so it does not get out while cooking, and you will get the hang of it as you go along. You will get faster and your wrapped grape leaves will be neater with experience. There is a huge learning curve for this dish.
5. If you can get others in on this project it will add speed and fun! Traditionally people sat around together to wrap grape leaves and talked and shared jokes as they did so, which takes the tediousness out of the process and provides a fun experience.


Serves 6 as main entree

Ingredients
---------------
-2 1/2 cups calrose rice (short grain)
-2 1/2 tablespoons safflower threads (similar to saffron)
-1 pound ground beef or lamb, a higher fat content will yield better flavor (2 cups)
-1 tablespoon salt
-1/2 teaspoon ground pepper
-2 tablespoons all spice
-2 tablespoons oil or clarified butter (ghee)
-up to 1/4 cup water (if your meat is of a higher fat content you will need less water)
-16 ounce jar of grape leaves, drained and rinsed

-2 pounds lamb or beef steaks (preferably bone-in and with a layer of fat)
-1 tablespoon lemon pepper (optional)

-1 cup peeled whole garlic cloves
-1 cup lemon juice
-4 cups water
-1 tablespoon salt
-2 tablespoons lemon pepper (optional, this provides an extra tang)

Optional:
-2 cups frozen artichoke bottoms
-11 ounces frozen green broad/fava beans
-1 cup sliced potato rounds
--Drizzle of oil or ghee

To make
------------
-Open the jar of grape leaves and carefully remove leaves. Place them in a large bowl with water to soak and rinse out any lingering dirt. I leave these for about an hour then rinse them in a strainer.
-While the grape leaves are soaking, fill another bowl with water and soak rice for an hour. Drain, rinse with WARM WATER and set aside.
-Using the same bowl used to soak rice (I hate extra dish-washing) place the strained rice and add the safflower threads, grinding them with the palm of your hand to break up. Mix them into the rice mixture to give your rice a yellow color. Add the remaining filling ingredients (ground beef/lamb, salt, pepper, all spice, oil and water) and using your hands, thoroughly massage all the ingredients together until they are well mixed. You want your mixture to be slightly "wet" either by oil or water. When adding the water add slowly and use what you need until the mixture clumps together and doesn't stick to your hands.
-Set up a clean work station and remove any large stems from your grape leaves. I use kitchen shears to quickly snip the tips off large stems.
-Arrange an assembly line of grape leaves, with the stem facing towards you and the pointy part of the leaf facing away (the smooth part of the grape leaf is what lays on the table, and the rough side with all the small stems is facing upwards).
-Place about 1 teaspoon to 1 1/2 teaspoons of filling (depending on the size of your leaf) onto the lower middle half of each grape leaf and arrange into a thin line. Place the filling about 1/2 inch from the bottom of the stem and 1/2 inch in from the left and right of the edge of the leaf, leaving more space between the filling and the top of leaf for when you will fold it up.
-Fold over the bottom of the leaf to cover the rice mixture, then bring in the left and right sides of the leaf in over the rice mixture as well. Then slowly wrap the grape leaf towards the tip of the leaf (rolling away from your direction), tucking in the edges as you go along. (SEE TUTORIAL PICTURES AT THE END OF THIS POST)
-Repeat the process until you have wrapped all of your grape leaves. You will get the hang of it as you go along. Place the grape leaves on a platter as you work, keeping the smaller grape leaves separate.
-Sprinkle your steaks with lemon pepper (or just salt and pepper) and sear them in a skillet until a browned layer forms, about 2 minutes on each side. If you are using a pressure cooker to make your grape leaves use that pot to sear the steak and leave them inside. If you are using a slow cooker after you have seared the steaks transfer them to the slow cooker pot and arrange in a flat layer.
-Sprinkle about 1/4 of your garlic cloves over the seared steaks. Layer your optional toppings over the steak . I place the green broad beans first and then the artichoke bottoms, alternating with more garlic after each layer, leaving only a few cloves.
-Carefully arrange the grape leaves, placing the smaller grape leaves first and working your way around the pot in a tight layer. Pack them firmly and end with your largest grape leaves. Sprinkle any remaining garlic on top. Sprinkle the salt and optional lemon pepper, then pour the lemon juice and water evenly over the top. You can add an optional drizzle of oil or ghee if your steaks are not fatty enough.
-Place a flat HEAT-PROOF plate over the grape leaves and a heavier object to weigh down the leaves and keep them in place. Years ago a friend of mine went to the beach and found a bunch of well sized flat and heavy rocks that were perfect for this. I still use mine every time even though I have the 'proper' heavy plate from Syria. Get creative with what you can use, you are looking for anything that will prevent the wrapped leaves from floating around the liquid and opening up as they cook.
-Cover your SLOWCOOKER and cook the grape leaves on high heat for 8 hours. If cooking in a PRESSURE COOKER you will cook on medium heat for about 2 hours after the pot is pressurized. If cooking in a REGULAR STOVE TOP pot you will cook anywhere from 2 1/2 to 4 hours on medium heat.
-The grape leaves have finished cooking when their leaf gets tender and the rice is cooked and fluffy on the inside. If your water dries up feel free to add a little more and adjust the lemon/salt content.
-Once tender and cooked through, uncover your pot and carefully tilt over a shatter-proof bowl to drain the liquid.
-Once the liquid is drained place a large platter over your pot (use something that sits flat on top of the pot) and quickly flip the pot over so the contents come onto the plate. Wait a moment to make sure everything has come off from the inside of the pot and remove your pot, taking care for the steam that will emerge as you do so.
-Serve with the extra liquid on the side, yogurt and warm pita bread.
-ENJOY! You deserve it after your hard efforts!


TUTORIAL PICTURES:

Step 1: Prepare the filling. The color of the rice when washed with WARM water and mixed with safflower (before meat and other spices are mixed in)

Step 2: Lay out your grape leaves and arrange the filling

Place the filling in the center

Step 3: Fold the edges of the grape leaf up from the bottom

Step 4: Fold the edges of the grape leaf in from the left and the right

Step 5: Start rolling the grape leaf upwards, away from you

Step 6: The finished product, with all the filling tucked tightly into the grape leaf


Step 7: Sear the steaks until you get a nice color

Step 8: Layer the steaks in your pot and add the optional fillings (these are artichoke bottoms)

Step 9: Layer the grape leaves, making sure to pack them tightly to each other and sprinkle the garlic around

I'd love to connect with you! Like SavvyChef on facebook and follow Savvy_Chef on instagram. Tag @SavvyChef in your creations  :)

Tuesday, March 17, 2015

Chocolate Chip Peanut Butter Oat Cookies


Oatmeal cookies are often deceptively high in fat, because oats tend to yield a dry and unappetizing lump of dough. Swapping out the butter for peanut (or any other nut) butter makes these soft, moist and chewy. These cookies are perfect when you want a peanut butter cookie that tilts to the healthy side. I LOVE that NO CHILLING is required since there is no flour! The oats give them a nice chewy texture and the slight amount of cinnamon is delicious with the peanut butter and chocolate chips. Use the best chocolate you have access to. I typically use Guittard chocolate chips or I chop up some creamy milk chocolate from the 1 pound sized bar found at Trader Joe's.


Get creative and add your own touch: dried fruit, m&m's, nuts...the flavor combinations are endless. I'm providing a base recipe that is easily adaptable, but I recommend staying within the measurements given.


Get yourself a cold cup of milk and get ready for a healthy and sweet treat! You're one bowl, a couple ingredients and 30 minutes away from something delicious ;)


Makes 20 cookies

Ingredients
-------------
-2 eggs
-3/4 cup creamy peanut butter, if using salted pb skip the salt addition below
-2/3 cup brown sugar
-1 tablespoon vanilla
-1 teaspoon baking soda
-1/2 teaspoon cinnamon
-pinch of salt
-2 cups rolled oats
-1 cup chocolate chips (this is a generous amount, you can use 1/4 cup less)
-1/2 cup shredded coconut
-2 tablespoons flax or chia seeds (optional)

To make
-----------
-Preheat oven to 350 degrees.
-With a spatula or in a mixer, stir together eggs, peanut butter, brown sugar and vanilla until smooth.
-Add baking soda, cinnamon and rolled oats and mix until well incorporated.
-Stir in chocolate chips, coconut and flax/chia seeds.
-Place rounded tablespoons onto a parchment lined baking sheet and bake for 8-10 minutes until the tops look a little dry but the cookie remains soft. Remove from the oven and let cool.
-Store leftover cookies well sealed at room temperature for up to 1 week.
-Enjoy!


I'd love to connect with you! Like SavvyChef on facebook and follow Savvy_Chef on instagram. Tag @SavvyChef in your creations  :)


Try these other healthy sweets!

Banana Oat Muffins


Raspberry Oat Bars

Friday, February 6, 2015

Eggs in a Blanket (Baked Eggs in Toast)


This is a creative way to have sunny side up eggs on baked toast.  Usually the two are eaten together, so why not combine them into a beautiful and fun presentation (and let's not forget the most important part, EASY)?! The toasted bread is the perfect vessel to hold your soft sunny-side up egg. Switch up your standard egg routine and give this a try :) I especially love this as a quick but healthy option for on the go breakfast. I wrap each one up in a napkin and hand them out as we're rushing out the door.


The kids loved indenting the toast and making a well for the eggs. Have fun and try to make different shapes in your toast! If you use a large piece of toast you can make the shape of a heart and crack 2 eggs into it.


I'm providing the instructions to make one egg on toast, but this is easily multiplied into whatever quantity you'd like.


 Just keep one thing in mind as you cook these: low and slow! If you turn the heat up too high your toast will burn on the bottom and your egg will not set. Give yourself less than 10 minutes and watch the magic happen :)

Makes 1 serving

Ingredients
---------------
-1 slice of toast
-1 egg
-salt and pepper

Optional garnish...get creative!
---------------------------------------
-tomato slices
-spinach, arugula, kale
-avocado
-hot sauce

To make
-----------
-Using anything round (I used a measuring cup), press down firmly in the middle of your toast, leaving about 1/2 diameter all around the edges. You are creating the well for your egg to cook without spilling over the toast. Press down as much as you can but be careful not to rip your toast.
-Place toast in a non-stick skillet or griddle and turn the heat on the lowest setting. Crack your egg directly in the middle of the toast. Lightly sprinkle with salt and pepper and cover with a lid.
-Let your toast cook for about 5-10 minutes, depending on how set you want your egg. For a runny egg cook closer to 6 minutes, for a firmer yolk cook about 9 minutes. Be sure to keep your heat on low to prevent burning your toast on the bottom.
-Remove baked egg and toast from skillet and enjoy!


I'd love to connect with you! Like SavvyChef on facebook and follow Savvy_Chef on instagram. Tag Savvychef in your creations  :)


Looking for more easy egg inspiration? Try my egg and cheese quesadillas, they're a favorite around here! 


Wednesday, January 7, 2015

Lemon Garlic Chicken and Potatoes (Jaj iw Batata)


I learned to make this from my grandmother in Syria many years ago. Every time I make it I feel a little nostalgic about childhood summers when she cooked it for us and I'm proud to prepare it for my own children now. Of course I've adapted it slightly to save preparation time, but it still tastes just like my grandma's :)

This is a simpler version of my popular sheesh tawooq recipe because everything gets thrown into one pot and its ready to eat in about 30 minutes. No special produce is required, just some chicken, potatoes, garlic and lemon...ingredients which are pantry staples for most of us.  I make this on nights when I'm pressed for time and my ingredients are limited. Of course squeezing fresh lemons is a more natural way to go, but when I'm in a pinch I've used bottled lemon juice and I'll tell you there's no shame in that game (although my Grandma would probably disown me if she found out I've done this because she's so authentic and natural in her cooking that she even prepares her own red pepper paste...)

This is a great dish for dinner parties because you can prepare it the night before and just place it in the fridge until you're ready to cook it. You can also use your slow cooker, following the same directions except increasing the cooking time to 4-6 hours. 

Ready to cook :)

Serves 4-6

Ingredients
---------------
-2 1/2 pounds boneless skinless chicken breast
-2 pounds gold potatoes (or russet, but you need to peel those first)
-1 cup lemon juice (you can add 1/2 cup extra if you like a strong lemon tang)
-1/2 cup minced garlic
-2 tablespoons red pepper paste (found in the ethnic section of large markets or in most Middle Eastern stores)
-1 tablespoon ground coriander
-1 tablespoon lemon pepper (optional)
-1 teaspoon salt
-1/2 cup olive oil
-4 cups water

To make
-----------
-Cut chicken breast into 1 inch cubes and place in pressure cooker (you can make this in a regular pot but increase the cook time to about 40 minutes or until chicken and potatoes are tender.)
-Wash and cut potatoes into 1 inch cubes and add to pot.
-Add lemon juice, minced garlic, red pepper paste, coriander, lemon pepper, salt, olive oil and water.
-Cover pot and pressurize. Reduce heat to medium and cook for 25 minutes.
-Release pressure from your pot,  uncover and stir gently. If you have too little sauce add some water. This is also a good time to adjust the lemon taste by adding more if you need it.
-Serve with pita bread and enjoy!

I'd love to connect with you! Like SavvyChef on facebook and follow Savvy_Chef on instagram. Tag Savvychef in your creations  :)


Monday, December 29, 2014

Peanut Butter Oreo Truffles


The only thing better than chocolate? Chocolate + peanut butter. Peanut butter lovers rejoice at this addition to the classic Oreo balls, and peanut butter haters are also pleasantly surprised at how well the flavors mix together. My daughter refuses to eat anything with PB but makes an exception for these truffles. Don't be discouraged if you're completely anti the peanuts, I've included the measurements for traditional Oreo truffles as well.


These are easy to make and are a good activity to involve kids in the kitchen because there is no stove top or oven required to make them. The hardest part about making these truffles is not eating the mixture before its complete, because it really tastes that good! The flavor of the Oreo mixture intensifies the longer it mixes with the cream cheese, so these are a GREAT dessert to make ahead of time! You can even keep the mixture in your freezer (as a whole portion of dough or pre-sized balls) and just dip them in chocolate when you're ready to serve.


A variation to dipping the mixture in milk chocolate is to use white chocolate chips. It tastes incredible...however white chocolate is annoying to work with and if the Oreo truffles are not super firm when you dip them in the chocolate the truffle dough will mix with the white chocolate as you dip them. Milk chocolate is much easier to dip, so for the sake of ease I've included the measurements for that here. When I have extra time I like to dip half my truffles in milk chocolate and half in white for the variety and color contrast :)


Ingredients
--------------
-36 Oreos (chocolate wafer cookies filled with cream)
-8 ounces cream cheese ( I always use reduced fat)
-2 tablespoons creamy peanut butter
-1/4 teaspoon vanilla
-1/8 teaspoon salt (if using salted peanut butter don't add extra salt)
**You can make regular chocolate Oreo truffles by reducing the amount to 30 Oreos with 8 ounces cream cheese and 1/4 teaspoon vanilla. Leave out the peanut butter and salt**

-1 1/2 cup milk chocolate chips (my favorite brand is Guittard)
-1 tablespoon vegetable oil

-1/3 cup peanut butter chocolate chips (I usually buy the Reese's brand or buy them during the winter season from Trader Joe's)
-1/2 tablespoon vegetable oil (I've found it takes more oil to make peanut butter chocolate chips smooth than it does for regular chocolate chips)

To make
------------
-Using a food processor (not necessary but this will give you the smoothest texture) grind the Oreos until they turn into a fine crumble. Add cream cheese, peanut butter, vanilla and salt and pulse the mixture in your food processor until smooth and well mixed. Place mixture in your freezer for about 30 minutes to set. You can leave it in your food processor bowl or transfer it to something else if you like to add more dishes to your sink ;) (Alternatively you can skip this step of freezing the mixture if you're pressed for time and move on to the next one, but your shaped truffles may not be as smooth because the soft mixture is sticky and messy).
-Remove your Oreo mixture from the freezer and shape into balls using a tablespoon scoop. Place the rounded truffles on a tray lined with parchment paper and refreeze for another 30-60 minutes until the truffles are firm.
-Place milk chocolate chips in a bowl with vegetable oil and microwave in 30 second intervals, stirring every 30 seconds until smooth and melted.
-Remove frozen truffles from the freezer and dip each ball in the chocolate and gently remove with a fork and tap off the excess chocolate, then place on the parchment lined tray. Repeat the process until all your Oreo truffles are coated. As the truffles start to come to room temperature dipping them will get messier, so try to work as fast as possible.
-Place the peanut butter chocolate chips with the vegetable oil in a bowl and melt in the microwave in 30 second intervals, stirring every 30 seconds until well melted. You may need to add more vegetable oil to get a smooth consistency. This mixture needs to be thinner than the milk chocolate coating. Place the melted peanut butter chips in a ziploc bag and close tightly, letting out the extra air. Snip the bottom of the bag and drizzle neatly across each truffle, until your truffles are all coated.
-Store in the refrigerator until ready to serve. These keep well for about a week.
-Enjoy!


I'd love to connect with you! Like SavvyChef on facebook and follow Savvy_Chef on instagram. Tag Savvychef in your creations and pin the recipes on pintrest :)


Monday, December 15, 2014

Raspberry Oat Bars (or any other fruit jam!)


One of the most frequent questions I get asked is how I bake all these sweets and who eats them...the simple answer is that the unhealthy stuff is only made for special occasions or to be taken somewhere...I can honestly say that I've probably never made a batch of brownies or a cake just for my immediate family to snack on. What I do constantly bake is healthy stuff that still tastes delicious, like these banana muffins or my personal favorite thing in the whole world. I love enjoying healthy sweets in the mornings, and streusel oat bars are near the top of my list. Clearing out my fridge after my Thanksgiving re-do dinner got me thinking about cranberry sauce beyond turkey, and I decided to create a healthy oat bar. Most of what I found online had a minimum of 1 cup butter or 1 cup peanut butter. I'm all about healthy fat, but I didn't want a strong nut flavor in my fruit bars just to replace the butter. Oat bars should be chewy, dense and have a little crunch on top to balance out the soft sweetness of the fruit filling. These are just that, with a nice inclusion of healthy fats and complex carbs.


If you don't have cranberry sauce lying around, use any fruit spread you'd like...I'll be making these a lot and my next fruit flavor will be strawberry, after that is fig and then I'm planning on apricot....now that I don't have to feel guilty when I eat these they'll be around here often! The first time I made these bars I used my cranberry sauce but each time after that as I continued to develop the recipe I used different jams, and raspberry with lemon zest was a huge success. Experiment with different toppings, I sprinkled shredded coconut and pistachios on half my pan and the adults enjoyed those a lot. I contemplated chocolate chips but decided to stay true to the fruit flavor, although I'm not making any promises for the next batch :)


These are easy to make, require only 1 bowl, no mixer and are vegan! Even if you don't mind using dairy products, its nice to be able to bake when you're out of eggs. This is a great activity to get kids into the kitchen and my boys had a lot of fun sampling the oat mixture and pressing it into the pan.

Ingredients
---------------
-1 cup flour
-1 cup old fashioned oats
-2/3 cup brown sugar
-1/2 teaspoon baking soda
-1/4 teaspoon salt
-1 teaspoon vanilla
-2 tablespoons cold coconut oil
-2 tablespoons peanut butter (I used a variety called Better 'n Peanut Butter, a 85% less fat spread I buy from Trader Joes)
-2 tablespoons orange juice (or almond milk, regular milk, water)
-1 teaspoon lemon zest
-1 tablespoon flax seeds (optional)

-1 cup raspberry jam (or other fruit)
OR
-1 cup cranberry sauce
-1 teaspoon cornstarch
-1/2 teaspoon orange zest

To make
------------
-Preheat oven to 350 degrees. Line an 11x7 inch (2qt/2L) pan with foil (for easy removal) and spray with non stick cooking spray.
Jam is spread and the oat topping is next
-Combine flour, oats, brown sugar, baking soda and salt and stir until well mixed. Then add the vanilla, coconut oil, peanut butter, orange juice, orange zest and flax seeds and mix well with a spatula until fully incorporated and crumbly.
-Using your hands, knead the oat mixture a minute and reserve 1 cup of the mixture. Pat the rest into your greased pan evenly and create a slight crust on the edges (this prevents the jam from spilling over the edges).
-Evenly spread the jam mixture over the oat layer, leaving about 1/4 of an inch all around the edges. This will spread out while baking. Sprinkle the reserved 1 cup of oat mixture on top of the jam. Sprinkle with optional toppings.
-Bake on the lower rack of a preheated oven for 28-33 minutes (I took mine out at 30 minutes) or until the crumbled streusel topping looks puffed in the middle and lightly browned. Remove from the oven and let cool, then cut into bars and enjoy. These do not need to be refrigerated and stay delicious for about 3 days (after that refrigerate or freeze to preserve freshness).
-Enjoy and don't forget to tag me in your pictures!


I'd love to connect with you! Like SavvyChef on facebook and follow Savvy_Chef on instagram. Tag Savvychef in your creations and pin the recipes on pintrest :)

Friday, December 12, 2014

Green Bean, Pomegranate and Sweet Potato Lentil Salad


So...maybe I'm on a lentil craze lately, but I can't help myself, the fiber content is just too awesome to ignore. I thought about this recipe a lot before I put it together. I wanted to create a salad that was different yet highlighted seasonal produce at their peak. Many of us are recovering from Thanksgiving and markets in America have readily made sweet potatoes and green beans available, so I put them together with some of my favorite ingredients for this satisfying, unique and unforgettable salad. Every ingredient will have you pausing in delightful surprise...who knew that green beans went well with pomegranates? Or sweet potatoes with lentils? Or that you could throw dates and maple syrup into a savory salad? Apparently I did, and I'm so excited to share it with you! A bonus perk is the fact that its paleo, gluten-free and vegan...score!


This is a sophisticated salad for the developed palette..."frou frou" ;)  The portion is just right for my husband and I to lunch on for a few days before its gone. The leftovers are BEAUTIFUL...nothing soggy or wilted, amazing for a salad! It also tastes great cold or at room temperature, which makes it a great picnic or potluck item to take and leave out without worrying about it going bad.


Serves 2 as dinner or 4 as a starter

Ingredients
---------------
-2/3 cup dry brown lentils or 1 1/2 cups cooked lentils (any color works, I just used brown for color contrast to other ingredients)
-6 cups salted water
-One piece of red onion (optional, but this flavors the lentils while cooking)
-8 ounces (about 2 loosely packed cups) fresh green beans
-1 cup diced sweet potato
-1 cup fresh pomegranate seeds
-4 medjool dates
-2 tablespoons thinly slivered red onion
-2 tablespoons chopped walnuts
-1 teaspoon cumin seeds
-1 scant tablespoon extra virgin olive oil
-1 scant tablespoon maple syrup


To make
------------
-Wash and strain lentils. Place in a a saucepan with salted water and a piece of the onion and bring to a boil. Once mixture is boiling, reduce heat and simmer for about 30-35 minutes, or until the lentils are soft with a slight chew.
-While lentils are boiling, wash, stem and chop green beans into 1/2 inch pieces. Bring another pot of simmering water to a boil and drop green beans into the water. Boil for about 2 minutes then immediately strain from hot water and place into a bowl filled with ice and cold water. This is called blanching the beans and prevents them from over cooking to retain their bright green color and a crisp texture. Let the beans cool in the water for a minute then strain well from the water and place into your serving bowl.
-Heat the same saucepan used to boil the beans and saute (I didn't use any oil but you can if you'd like) the chopped sweet potatoes. Season with salt and pepper and stir frequently. Cook for about 5 minutes, until browned on the outside and softened when you taste a piece. Once these are finished cooking, remove the pot from the stove and allow the sweet potatoes to cool completely, then add them to the green beans.
-Add the pomegranate seeds to your serving bowl.
-Pit the medjool dates and then cut into thin, long slivers. I cut about 7-8 slices from each date. Add the slivered date slices to the serving bowl.
-Chop the red onion and add to the serving bowl.
-Break up the walnuts into small pieces and add to the serving bowl.
-Add cumin seeds then drizzle olive oil and maple syrup to the other ingredients and gently mix the salad. Taste and adjust the salt seasoning. Salt really helps bring out the flavors and cut back on the sweetness, so make sure to season properly.
-Serve cold or at room temperature and enjoy!


I'd love to connect with you! Like SavvyChef on facebook and follow Savvy_Chef on instagram. Tag Savvychef in your creations and pin the recipes on pintrest :)

Thursday, December 4, 2014

Musakhan: Middle Eastern Chicken Rolls


These are pretty much the Middle Eastern version of taquitos :) Musakhan chicken wraps are based on a classic Palestinian dish that has gained in popularity all over the Middle East in sandwich form. Traditionally whole chicken pieces are seasoned and cooked in a clay oven then placed on top of fresh flat bread. Classic musakhan (msakhan/imsakhan) is a special meal shared with a group of  family and close friends where everyone gathers around and gets their hands dirty eating the chicken and bread...often times straight from the large platter it is served on. It is truly a delicious meal to eat and one that I will share with  you sometime. This version is for a beginning or busy cook, looking for something fast, delicious and e.a.s.y. I love to prepare a batch of these and keep them unbaked in the freezer, ready to be grilled at a moment's notice for a quick lunch or on the go meal.

Using rotisserie chicken is a huge time saver, and this is also a great recipe for leftover chicken. Simply scale back on the portions to make as much as you need, my general rule is 1 cup onions/1 cup shredded chicken/ 2 tablespoons sumac seasoning and you can take it from there. The measurements I've listed make about 18 tortilla wraps. and usually each tortilla is cut in half or in thirds. If I'm making them as a main meal I leave them whole, otherwise I do cut them. The pictures in this post show the rolls cut in half.


Typically there is no lemon juice added to musakhan but I like to include it to provide juiciness to the filling while cutting back on the oil and enhancing the sour tang of sumac. If you're not trying to make this as healthy as possible, go ahead and use more olive oil. I add a tablespoon at the end of the cooking process because I've found that it enhances the olive oil flavor without having to use too much in the beginning. Many people will just saute onions, add chicken and sumac and call it a day...but that's not the way we roll at SavvyChef. Our food has texture, flavor, complex layers of subtlety, and you just can't get that without spending a little extra effort on the filling. This dish is almost guaranteed to be present at any Middle Eastern dinner party because of its simplicity and popularity, but I promise you: all musakhan rolls are not created equal.

The main flavor in the filling is the sumac, a seasoning that comes from sour berries that are dried and ground into a spice. It is purple in color and has a tangy flavor similar to lemons. You can buy sumac from any Middle Eastern market or online. The spices that are listed as optional are not traditional and many people leave them out, but I never do as they really provide for a flavorful filling, I encourage you to use them. My children like to dip these in plain yogurt, which is a little blasphemous for traditional  musakhan eaters, but hey...whatever provides for a peaceful meal around here is fair game...


Makes about 18 full wraps (feeds 6-8 for dinner or 20 for an appetizer)

Ingredients
---------------
-2 tablespoons olive oil
-4 cups thinly sliced red onion (or other variety)
-4 cups cooked, shredded chicken (Rotisserie chicken is a GREAT short cut)
-4 tablespoons lemon juice
-1 cup sumac seasoning
-1/2 teaspoon black pepper
-1 teaspoon allspice
-optional: 1 tablespoon lemon pepper seasoning
-optional: 1 tablespoon ground coriander
-optional: 1/2 teaspoon ground cardamom

-optional: 1 cup toasted nuts (usually pine nuts, but slivered almonds are a good substitute)
-1 tablespoon olive oil
-about 18 flour tortillas

To make
------------
-Heat oil in a large pot then add sliced onions. Saute until caramelized, about 15 minutes, stirring frequently. This is a good time to shred your rotisserie chicken.
-Add shredded chicken, lemon juice, sumac, black pepper, allspice, coriander and ground cardamom. Break up the chicken as you cook and mix the ingredients together, letting the chicken soak up the flavors and seasonings. Cook mixture on low heat for about 5 minutes. Add optional toasted nuts and then remove the pot from heat.
-Place the pot aside to cool the mixture and add final tablespoon olive oil. Use the best quality you have.
-Preheat your oven to 450 degrees and line a baking sheet with foil. Spread between 1/3-1/2 cup of chicken filling along the longest length of your tortilla in a horizontal line, starting 1/2 inch up from the bottom. Make sure your filling is spread evenly across, then bring the bottom edge of the tortilla up over the filling and wrap tightly. Place the rolled tortilla seam side down on the baking sheet. Continue this process until you have finished your chicken filling.
-Optional: Brush the wrapped rolls with olive oil to enhance crispiness when toasting. (You can cook these in a skillet, griddle, panini press or in the oven. When I make them for a crowd I always place them in the oven because I can do them all at once. Sometimes I'll skip preheating the oven and just place the tray on the middle rack of my oven on broil, watching CAREFULLY for a few minutes while the tops toast). Bake on the middle rack of a pre-heated oven for about 10-15 minutes or until toasted to your liking.  Remove from the oven and let cool slightly before you cut them in half or in thirds. Another option is to cut them before toasting as this will give you toasted edges on all the pieces.
-Serve and enjoy!

Evenly spread 1/3 cup chicken filling across tortilla
This is a perfect starter recipe for beginning cooks
Brushed with olive oil and ready to bake
I'd love to connect with you! Like SavvyChef on facebook and follow Savvy_Chef on instagram. Tag Savvychef in your creations and pin the recipes on pintrest :)

My daughter shared her finished musakhan with friends